In my previous post about DSLR, I have done some testing by taking landscape photos at the nearby lakeside yesterday evening. I've testing in terms of lighting and colors.
I did some tweaking to the tones and the RGB levels to achieve some picture effects. Although the tool accompanied with the package is not as great as Adobe Photoshop, none the less, it has the essential features that includes crop as I like to compose my images in the 2.35:1 style images and improving the shots from the raw image.
I had these settings used when capturing the raw images - see the sample above.
I did some tweaking to the tones and the RGB levels to achieve some picture effects. Although the tool accompanied with the package is not as great as Adobe Photoshop, none the less, it has the essential features that includes crop as I like to compose my images in the 2.35:1 style images and improving the shots from the raw image.

I had these settings used when capturing the raw images - see the sample above.
- ISO of 200 - usually used at outdoors day time.
- Shutter speed of 500. I thought of 320, but I am worried that the images will not be captured nicely.
- Aperture of 2.8 on wide angle and 3.2 in telephoto mode. I feel that the bigger the aperture, the better the images are when captured with natural light.
- No flash at all.
- I used the Neutral color setting to achieve actual reality images.
I went home and did some and I find it behaving nicely. The only problem I have is night time shots, something which I did by doing a test shot in the room with one small light source but it is a little too bright.

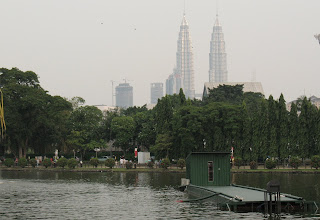
I noticed that the composition above is like the un-squeezed widescreen frame - 1.85:1. The raw image here is that there is no blue tones here. It's more or less the cloudy, greyish look unlike this. It was also slightly bigger at full frame. I added more blue tones in there with a little red so that the picture above looks like it's shot in morning magic hour.
Magic hour is somewhere between 7 to 8 in the morning and 6 to 7 in the evening.
Unfortunately, loading this picture up here on the post is a little long. Maybe about a few minutes despite having a good connection. That's because the size of the file is at 1 MB plus, given that it is shot at 8 MP.
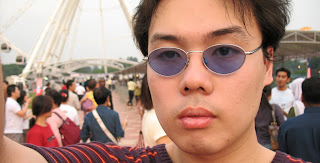
This self-portrait was re-framed as the squeezed widescreen format. I added sharpness of about 30%, 0.25 pixels and 5 levels.
Overall, I think that the Canon ZoomBrowser did at least accomplish the basic features but isolation of the picture element is not possible. But if you don't want to get the hands dirty on, it's okay. But cool thing about this is learning to do everything yourself - without the advance guide included in the package!
No comments:
Post a Comment
You are welcome to post in any comments that do not trouble readers of the blog.
Providing an ID is recommended. If some reason you wish to use an Anonymous name, please leave a name below your comments. From now on, comments with no names will not be considered for moderation.